Django: Automated testing with selenium

Hello again,

A couple weeks ago I wanted to test the templates of a site I’m building, mainly javascript functions and some user interactions, and decided to use selenium.

I wanted to use raw selenium because that’s my first time using it in python, so I wanted to learn how it works without the help of third-party modules.

To my surprise, I didn’t find a straight forward tutorial, so I’m writing one with the steps I did to make it work. The tests I created are available at the end of this post.

It’s worth noting that I used selenium 3.1, django 2.1 and python 3.6. Running the server on Ubuntu 18.

Let’s begin!

1. Installation

The first step is to install selenium. I used pip for that:

pip3 install selenium

Selenium requires a driver to launch the browser, and each browser has its own. Firefox, the one I chose, uses the geckodriver, which is available here.

The driver must be in a folder listed in the PATH environment variable. In Ubuntu, just move it to the /bin folder and it’s ready to use.

2. StaticLiveServerTestCase

Selenium demands the test class to be either a LiveServerTestCase or a StaticLiveServerTestCase, that’s because it needs the server running to test the site.

Both classes are similar, the difference is that the latter will load the static content (custom css and javascript files for instace) while the former won’t.

I prefer StaticLiveServerTestCase because one of the reasons for using selenium is to test the javascript functions, so, static content is necessary.

3. Class Structure

The main methods to consider are:

  1. setUpClass(): executed once before the first test.
  2. tearDownClass(): executed once after the last test.
  3. setUp(): executed before each test.
  4. tearDown(): executed after each test.

The setUpTestData() isn’t on the list because it isn’t available in LiveServerTestCase.

A good place to open the browser is in the setUpClass() because it takes long to open it, this way it’ll use the same window in all the tests. What leads to using tearDownClass() to close the browser.

In a LiveServerTestCase the database is flushed after each test, then it’s necessary to populate it before each test too. Either setUp() or the own test are good places for it, although setUp() is the expected place and should be favored.

tearDown() isn’t really necessary for the base structure but it’s good to know that it exists :3

The base test class should look like:


from django.contrib.staticfiles.testing import StaticLiveServerTestCase
from selenium import webdriver
class TestName(StaticLiveServerTestCase):
@classmethod
def setUpClass(cls):
super().setUpClass()
cls.browser = webdriver.Firefox()
@classmethod
def tearDownClass(cls):
cls.browser.quit()
super().tearDownClass()
def setUp(self):
super(TestName, self).setUp()
# Populate the database here

4. live_server_url

To access a webpage in selenium we must use the URL of the testing server. The URL changes everytime time you run the tests, a different port is assigned to the server, but it’s stored in the variable live_server_url. An webpage can be accessed like this:


def test_create_button(self):
self.browser.get(self.live_server_url + 'question/create/')
# Test the page

view raw

server_url.py

hosted with ❤ by GitHub

5. Explicit and Implicit Waits

As far as I know selenium waits the page to be ready before executing commands. However, in some cases we will need to wait some action to complete so we can resume testing the page.

Usually this happens when a javascript function is used, and we must wait its completion, or when the test case loads another page and we should wait for it, otherwise the next comands will run in the initial page and fail.

In those cases we can use both implicit or explicit waits. The implicit one simply stops the execution for a fixed amount of time, you can use it as in:

driver = webdriver.Firefox()
driver.implicitly_wait(10) # in seconds

Usually, implicit waits are a bad choice because you’ll risk either having unnecessarily long wait times or inconsistent tests.

Explicit waits, on the other hand, are more reliable. They’ll wait for a given expected condition to happen and resume as soon as it does. The following example shows how to wait for an element to be clickable:


from django.urls import reverse
from selenium.webdriver.support.ui import WebDriverWait
from selenium.webdriver.support import expected_conditions as EC
from selenium.webdriver.common.by import By
def test_title_redirects_to_details(self):
self.browser.get(self.live_server_url + reverse('question-list'))
title = WebDriverWait(self.browser, 5).until(
EC.element_to_be_clickable((By.CSS_SELECTOR, '#question2 .card-link-title'))
)

There are multiple builtin expected conditions which you can find here. Notice that some conditions expect a locator, like element_to_be_clickable(locator) in the snippet above, in this case you should use the By class. You can find all the available locators here, the usage of them all is similar to By.CSS_SELECTOR.

6. Login user in code

In some tests it might be useful to login the user in code. The other option is using selenium to simulate the actual login, which will take longer. In case you are testing a page that requires the login instead of the login page, it’s better to save this time.

The trick I found to login the user is to use cookies to pass a logged in session to the browser. You can set the cookie in the setUp() like:

view raw

login_cookie.py

hosted with ❤ by GitHub

This trick will make the slow tests a little less slow 🙂

7. Auto ids

At last, I’d like to warn you about creating objects in the database when the model uses auto generated ids. It happens that the database is flushed between tests but the auto id counter won’t necessarily reset.

Then, if you add two objects to the database, their ids will be 1 and 2 in the first test and 3 and 4 in the second. This behavior might break some tests which use the id to identify the object. In this case, always set the id yourself, like:

8. Example

With everything stated above you should be ready to test your project with flexibility. I’ll also leave the tests I created here as reference, hope they help 🙂

Django: Create and test a view with two forms

Hello!

I’ve been working on a front page for a personal site. The first thing was to decide what should be in it. After some research and much thought, I decided to have both the login and register forms in the page, along with a single phrase that describes the site. I like this design mostly because the user is at 0-click distance from both login and register.

Having Linkedin and Quora as my main inspirations, I eventually implemented it. Here is the first version:

front_page
Login and register form in front page

I should improve the brand name and its core message soon, but I liked the design.

Fine, enough said about the design, let’s see how it works. FYI, I’m using Django 2.1 and assuming that you know how to build a view with a single form, in case this premise isn’t valid, refer to Django forms.

I found two options for having two forms in a single page:

1) Have separate views and use the same template in both.

2) Have a single view and template.

I don’t like 1) because, as far as my knowledge goes, it requires two different URLs for the “same” front page. Even though handling the forms and creating tests for them easy.

To follow with this option you just need to create two views and point the forms to their respective ones, by setting the action as the view URL. The rest is similar to create a view with a single form:


<form class="" method="post" action="{% url 'login' %}">
</form>
<form class="" method="post" action="{% url 'register' %}">
</form>

That’s it.

Now, for 2) we just need to find a way to identify, in the view, which form has triggered the POST request. There are multiple ways to do this. I chose to use a trick I found out there, it is to create a name attribute in the submit button and identify the form there. The template should have something like:


<form method="post" action="{% url 'front-page' %}">
<!– Login form fields –>
<input type="submit" value="Login" name="login_form"/>
</form>
<form method="post" action="{% url 'front-page' %}">
<!– Register form fields –>
<input type="submit" value="Register" name="register_form"/>
</form>

Notice that both forms point to the same view {% url ‘front-page’ %} and the submit inputs have different names.

In the view we just need to find which name is in the POST request, like:


from django.contrib.auth.forms import AuthenticationForm
from django.shortcuts import render
from research.forms import UserCreateForm # Custom register form
def front_page_view(request):
if request.method == 'POST':
if 'login_form' in request.POST:
login_form = AuthenticationForm(request=request, data=request.POST)
register_form = UserCreateForm()
# Do things for the login form
elif 'register_form' in request.POST:
login_form = AuthenticationForm()
register_form = UserCreateForm(request.POST)
# Do things for the register form
else:
login_form = AuthenticationForm()
register_form = UserCreateForm()
return render(request, 'front_page.html', {'register_form': register_form, 'login_form': login_form})

Now the front page works with both the login and register forms. We should create some tests to guarantee the view works properly.

There are multiple tutorials about setting a test environment for Django, then I’ll focus only in how to test the right form in a view which has two. There’s no big secret, the snippet bellow speaks for itself:


from django.test import TestCase
from django.contrib.auth.models import User
from django.contrib import auth
class FrontPageViewTest(TestCase):
@classmethod
def setUpTestData(cls):
""" Creates 1 user """
test_user1 = User.objects.create(username='Testuser1')
test_user1.set_password('senha8dg')
test_user1.save()
def test_user_login(self):
response = self.client.post('/',
{'login_form': 'True', 'username': 'Testuser1', 'password': 'senha8dg'},)
user = auth.get_user(self.client)
self.assertTrue(user.is_authenticated)
self.client.logout()
response = self.client.post('/',
{'login_form': 'True', 'username': 'Testuser2', 'password': 'senha8dg'},)
user = auth.get_user(self.client)
self.assertFalse(user.is_authenticated)
def test_user_register_creates_user(self):
self.client.post('/',
{'register_form': 'True', 'username': 'Testuser2', 'password1': 'senha8dg', 'password2': 'senha8dg'},)
try:
User.objects.get(username='Testuser2')
except Exception as e:
self.fail('Exception: ' + str(e))
# Challenge tests
def test_redirect_if_logged_in(self):
self.assertTrue(self.client.login(username='Testuser1', password='senha8dg'))
response = self.client.get('/')
self.assertEqual(response.status_code, 302)
def test_last_used_form_has_autofocus_after_fail(self):
""" Test if register form has focus after failed register and login form has focus after failed login """
response = self.client.post('/',
{'login_form': 'True', 'username': 'Testuser1', 'password': 'wrong'},)
self.assertTrue('autofocus' in response.context['login_form']['username'][0].data['attrs'])
response = self.client.post('/',
{'register_form': 'True', 'username': 'Testuser2', 'password1': 'wrong', 'password2': 'wrong'},)
self.assertTrue('autofocus' in response.context['register_form']['username'][0].data['attrs'])

Look at the POST request in test_user_login():

self.client.post(‘/’, {login_form: True, username: Testuser1, password: senha8dg},)

It makes a POST request to the URL ‘/’ (front page) and has the key ‘login_form’ in the data it passes to the view. This acts similarly to clicking the login button. Testing the register form is similar, see test_user_register_creates_user().

That’s it, we can test the front page now 🙂

Furthermore, there are two challenge tests in the snippet above, they initially failed when I built the first version and I found fixing them a good learning experience, which I recommend.

I might make a post for them, maybe, the future will tell… See you!

Bootstrap 4: Delete confirmation modal for list of items

Hello again!

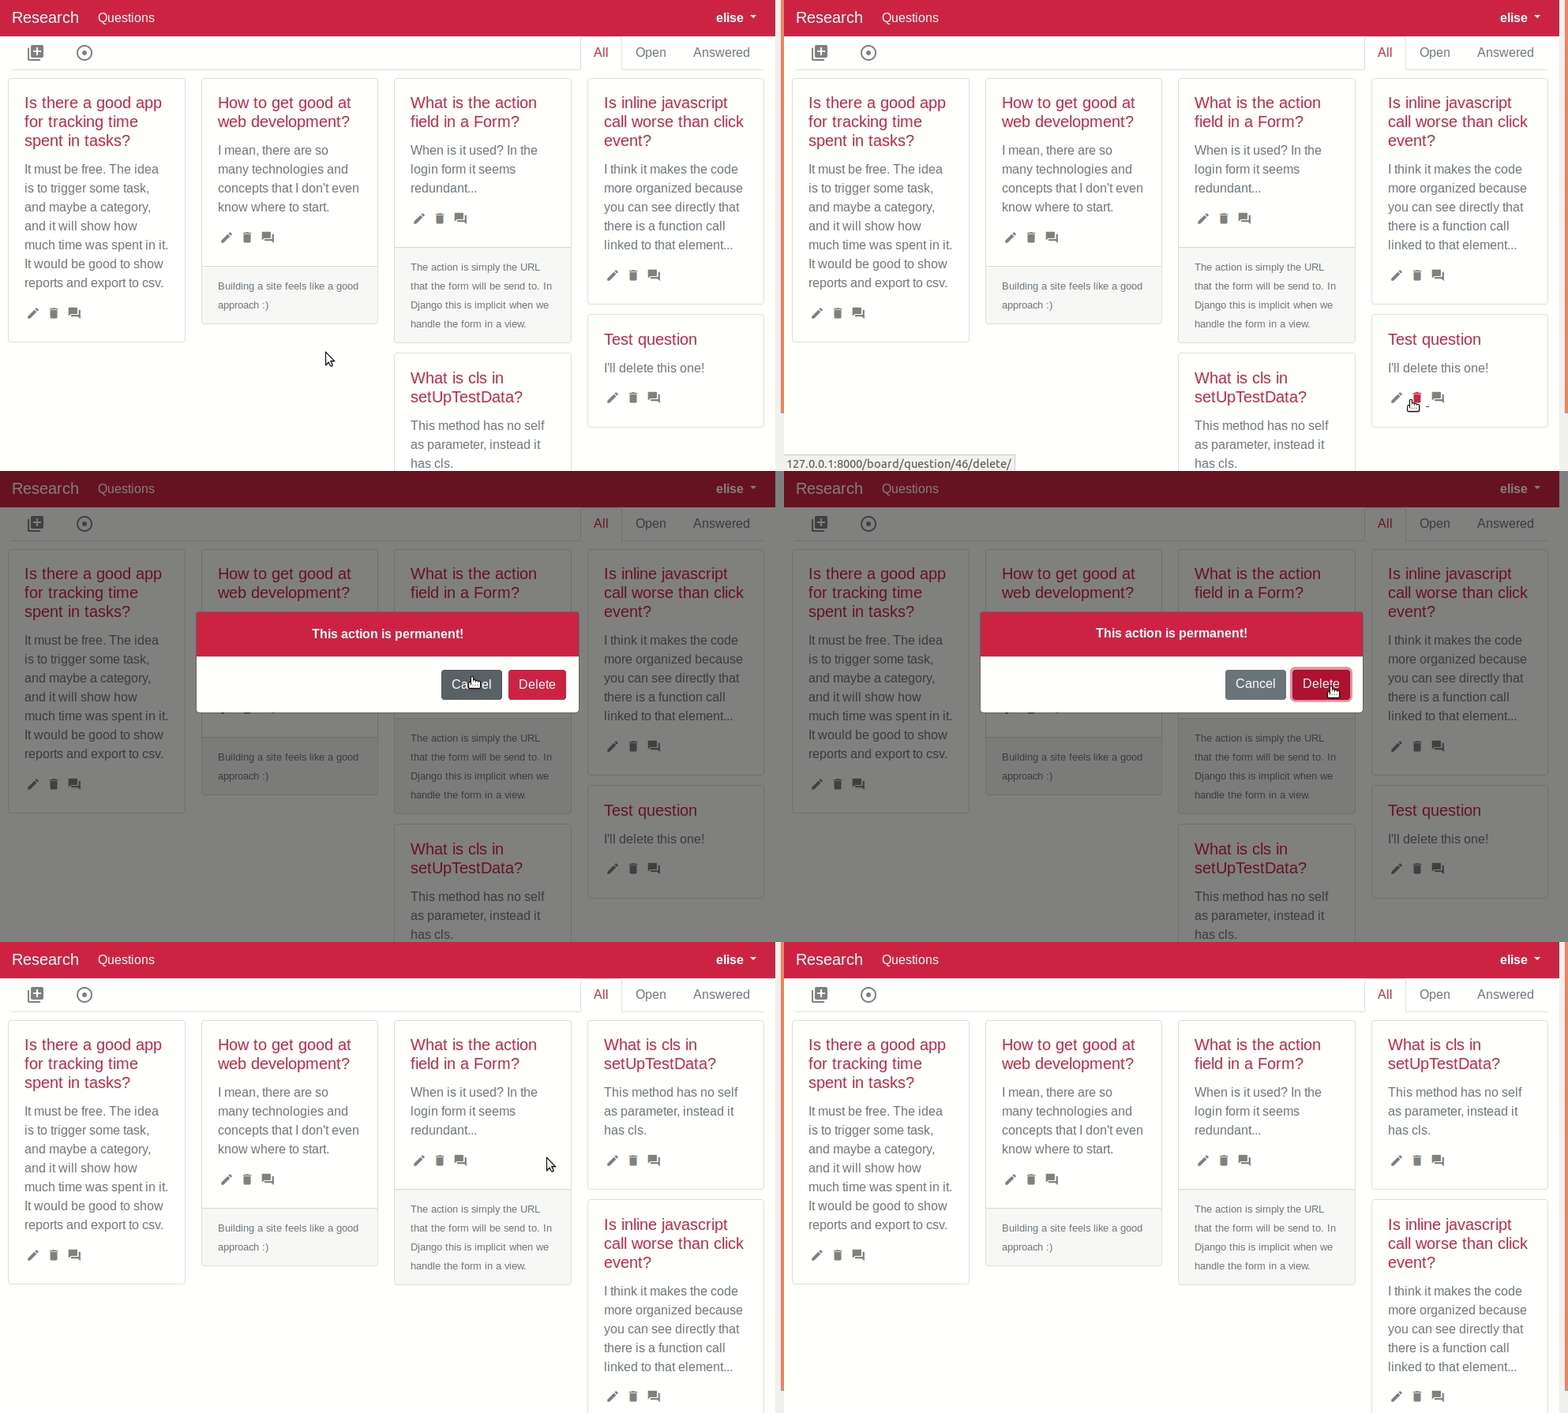
A couple days ago I wanted to use a modal to confirm the deletion of an item in a list. Like this:

delete_confirmation_modal
Confirm delete modal

The requirement were: 1) have a single modal in the page and 2) make a reusable modal, since it’s possible to delete items from other views too.

When there is a single element assigned to the modal, we can use something similar to a logout confirmation modal. However, when there are multiple elements in a list, this isn’t enough. It’s necessary to track which element last triggered the modal for deleting the right one.

To do this, we can add an attribute to the modal, let’s call it caller-id, and assign to it the id of the element which last called the modal. When the confirm button is clicked, it redirects to the href of the caller element, which should be the URL to delete it.

In order to meet the second requirement, we should write the modal in a separated HTML file, which can be included in any desired page. The one I used was:


<!–Delete button will redirect to the href of the element with 'id = caller-id' property in this modal–>
<div class="modal fade" id="confirmDeleteModal" tabindex="-1" caller-id="" role="dialog" aria-labelledby="confirmDeleteModalLabel" aria-hidden="true">
<div class="modal-dialog" role="document">
<div class="modal-content">
<div class="modal-body confirm-delete">
This action is permanent!
</div>
<div class="modal-footer">
<button type="button" class="btn btn-secondary" data-dismiss="modal">Cancel</button>
<button type="button" class="btn btn-danger" data-dismiss="modal" id="confirmDeleteButtonModal">Delete</button>
</div>
</div>
</div>
</div>

And, to associate a button to the modal, we can use something similar to:


{% include 'board/confirm_delete_modal.html' %}
<a href="{% url 'question-delete' pk=question.id %}" class="confirm-delete" title="Delete" data-toggle="modal" data-target="#confirmDeleteModal" id="deleteButton{{question.id}}">

I’m using Django 2.1, and the snippet above shows in the first line how to include the confirm_delete_modal to the template. My app is named board, you should replace it with the right path for the file.

Line 3 shows how to associate a tag to the modal. In its original template, I iterate in a list of questions, where the current question is stored in the object question.

Note that every element associated to the modal must have a different id, and, in this case, have the class confirm-delete.

The last step is to perform the actions using JavaScript. I used jQuery in this example:


$(document).on('click', '.confirm-delete', function () {
$("#confirmDeleteModal").attr("caller-id", $(this).attr("id"));
});
$(document).on('click', '#confirmDeleteButtonModal', function () {
var caller = $("#confirmDeleteButtonModal").closest(".modal").attr("caller-id");
window.location = $("#".concat(caller)).attr("href");
});

The first block adds an event handler for the click event in elements of the class confirm-delete. When the click happens, it writes the id of the element in the caller-id of the modal.

The second block adds a handler for the click event of the confirmation button inside the modal. It finds the element which toggled the modal, by the called-id, and redirect the page to the its href, the delete URL in this case.

That’s it, now we have a generic confirm deletion modal. It can be reused in other views by including its HTML to the template, and adding the confirm-delete class to the buttons which should trigger it.

By writing this post I realized that I didn’t really need the class confirm-delete, using the selector data-target=#confirmDeleteModalinstead seems simply better. I’ll try this way next time :3

Bootstrap 4: Trigger page redirect after modal is hidden

Hello, long time no see… I’m learning the basics about web development and am building a site to use as my workshop. Some things I try to do appear to be very common but there isn’t an easy-to-find thread on stack overflow or blog post about it, the information is there but is scattered.

Executing a redirect after hiding a modal is one of these things and I’m here to show a direct approach for doing it using Bootstrap 4.1. Also, I’m using Django 2.1.

I needed it to create this logout flow: 1) click the logout button, 2) a modal shows the log out confirmation and 3) the user is redirected to the logout URL.

Since I’m using Django’s builtin registration views [1], the log out is done by simply redirecting the user to the {% url ‘logout’ %}. That URL will log the user out and render a specific template, which, in this case, I left with a single script to redirect to the login page.

Okay, the first step is to add the modal to the template, put it anywhere inside the <body> of the page. I’m using a simple Bootstrap 4 modal [2]:


<div class="modal fade" id="logoutModal" role="dialog" aria-labelledby="logoutModalLabel" aria-hidden="true">
<div class="modal-dialog" role="document">
<div class="modal-content">
<div class="modal-body logout">Logged out!</div>
</div>
</div>
</div>

And the custom CSS:


:root {
–color-danger: #dc3545;
}
.modal-body.logout {
color: white;
text-align: center;
vertical-align: middle;
background: var(–color-danger);
font-weight: bold;
}

The second step is to show this modal when a button is clicked. I’m using a dropdown item [3] as a button inside a navigation bar [4]. The tag of this item is:


<a class="dropdown-item" id="logoutButton" href="{% url 'logout' %}" data-toggle="modal" data-target="#logoutModal">Logout</a>

It toggles the modal with id=”logoutModal” as you can see in the data-toggle and data-target properties. This is enough to show the logout confirmation when its clicked.

You can also see that this item has a href that points to the correct logout view. However, this isn’t automatically triggered along with showing the modal. I think Bootstrap overrides this behavior but let’s keep the href there so we can use it in the next step.

To accomplish the desired redirect I needed to use javascript (jQuery). The idea is to bind an event handler for when the modal is hidden, like this:


$(document).on('hidden.bs.modal','#logoutModal', function () {
window.location = $("#logoutButton").attr("href");
});

This triggers the redirect whenever the modal is hidden. Notice that in the function I get the URL from the href property of the logout button. We could write the URL directly to window.location, but getting it from the href puts all the important information in the same place, the tag which toggles the modal.

Beware, you’ll find many people out there suggesting the following:


$("#logoutModal").on('hidden.bs.modal', function () {
window.location = $("#logoutButton").attr("href");
});

That won’t work in this case because the modal is initially hidden, then jQuery won’t bind the handler to it. You should bind the handler to something visible, document for instance.

Now, when the logout button is clicked, the modal already shows and expects the user to click anywhere in the screen for it to disappear and trigger the redirect. Additionally, I’m using the following event handler to hide the modal 5 seconds after its shown:


$(document).on('shown.bs.modal','#logoutModal', function () {
setTimeout(function() {$('#logoutModal').modal('hide');}, 5000);
});

The final step is to redirect to the login page after the logout. I use the following looged_out template:


<script>
function redirect(){
window.location.href = "{% url 'login' %}";
}
redirect();
</script>

view raw

logged_out.html

hosted with ❤ by GitHub

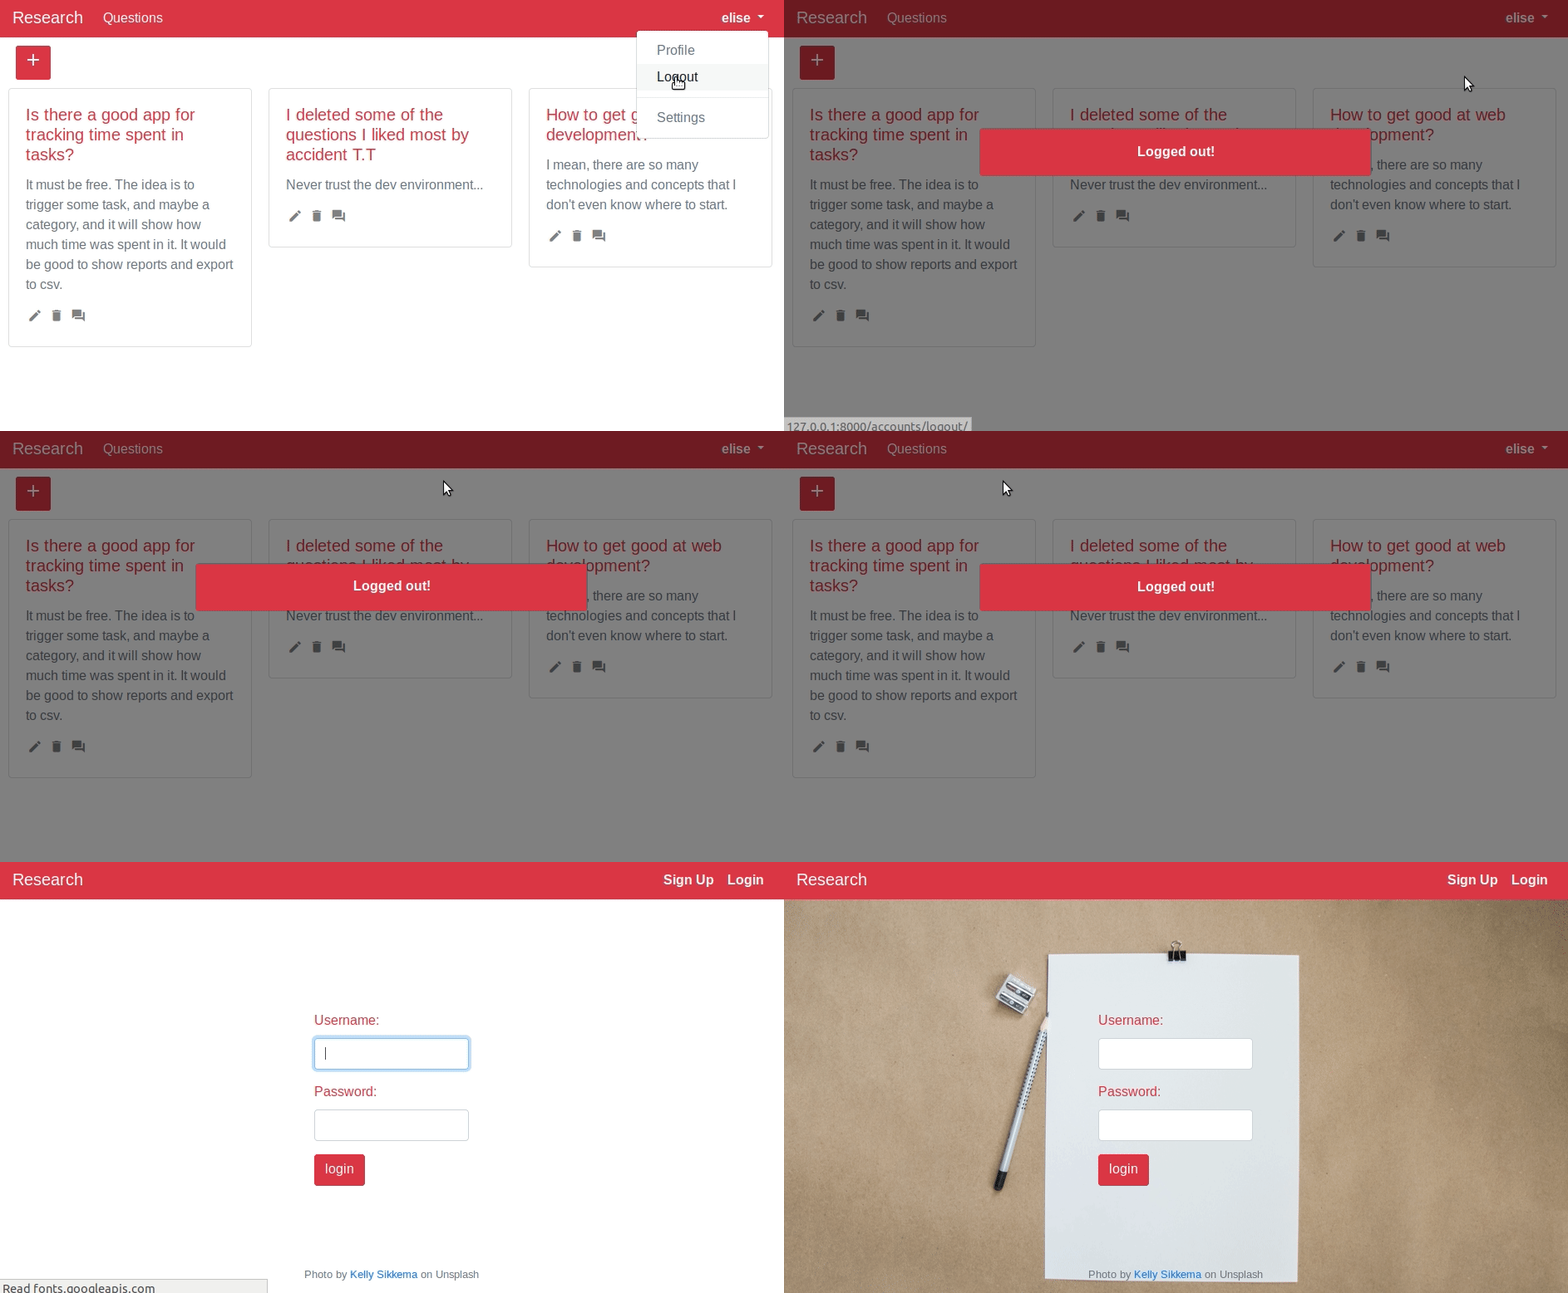
The logout flow is all set now, the result will look similar to:

redirect_after_modal
Trigger redirect after modal fades

In this flow the confirmation is shown before the actual logout. In some corner cases the logout might fail even after the confirmation that it worked, which is a problem. However, it works most of the time and I think the effect looks nice :3

To fix this I’ll probably have to use a custom logout view but this isn’t worth the effort for now, the site’s core feature isn’t working yet, and it is a bigger priority.

Also, I’m sure there are better ways to organize the abstract links between HTML and JS, my initial impression is that there aren’t many organization rules in web development. Hope to develop this intuition with practice.

That’s it, I’ll try to post everything that I find relevant in building this site, then I should be back soon 🙂

References:

[1] Django Authentication

[2] Bootstrap Modal

[3] Bootstrap Dropdown

[4] Bootstrap Navbar

Visual Studio: Put git hash in version

Hello again! Recently I faced the problem that I needed to recover the code, which generated a dll, only by looking at the dll itself.

The project had many independent contributors, and was deployed to a few different environments, what triggered a few versions from local branches.

Version numbers alone didn’t solve it, but let’s talk about them first.

Versioning is a common problem in software development, however, there isn’t a consensus about how to properly version a project. There are some guidelines, and a lot of discussion out there, but in the end, the team should choose what works best for them.

I like to use three numbers, major.minor.revision, starting at 1.0.0 it progresses like that:

  • Increase major version whenever the changes aren’t backwards compatible. Usually those are great changes and this number shouldn’t be increased often.
  • Increase minor version whenever you add a new feature which is backwards compatible.
  • Increase revision version after minor changes, like bug fixes, organization commits etc.

I find those three numbers enough, along with the trick I’ll show you next, but a fourth number at right might be useful:

  • Local version, it means how many local changes, not pushed commits for instance, were made.

Back to the initial problem, from its many solutions, I found best to input git info into the dll version, and make it automatic, then there is no chance to forget doing it. The trick was to use hooks.

First I tried git hooks, it didn’t work, but let’s take a look at them anyway :3

Git hooks are shell scripts that are hooked to an action, they are executed whenever the action is triggered, before or after it, depending on the hook. Those scripts must be put in the folder ‘ProjectFolder/.git/hooks’, you can see a few samples from git in that folder already. To activate a hook just remove the .sample extension and it’s ready.

The idea was to write the git hash in the version file right after a commit and amend the changes, that’s it, only a post-commit hook needed.

Little did I know that there is no amend, there is only removing the last commit, adding the new changes and making a new one, with a different hash, then the hash number in the version is meaningless.

Luckily there are also build hooks, the same principle of git hooks applied to the building process, then the solution was to write the git hash in the version file right before building the dll. I used Visual Studio 2013 and C# for this but it should apply to other tools as well. (This one works)

Actually, I preferred to create an additional version file, containing only the git info. Its possible to overwrite the standard version file but I didn’t want to unload the project for every version change. Probably this can also be avoided but I didn’t find an easy way :3

Visual Studio offers a visual interface to define hooks, go to Project Properties -> Build Events and you can see the text boxes for Pre-build and Post-build events. As far as I know those commands will be executed in the Windows PowerShell at the right time. You can also define the hooks directly in the csproj file, which I preferred.

This file is a XML file, where the propertie DefaultTargets, of the Project tag, register the hooks, having Build as the main build event. The events are executed in the same order they appear. Take a look:


You can see that the Version hook, which creates the version file, is executed right before building the project. After building the Clean hook, which deletes the version file, is executed.

Ok, now we just need to register the hooks, luckily its very easy, just create a Target tag, right under the Project tag, with the hook name as a property, like this:


The only missing piece is the git hash, to add it into the version I used the package MSBuildTasks, its available via NuGet. We just need to install it and add the following tag in the csproj file:


Right under the tag:


Beware of the MSBuildTasks version, check which one is installed in the packages folder inside the project folder.

With MSBuildTasks you can use the GitVersion tag, which defines a few environment variables, being one of them the git hash. Since a code snippet is worth a thousand words:


You can see that the git directory is defined and that GitVersion outputs the parameter CommitHash from its inner property with the same name. Right after, this parameter is used in the AssemblyInformationalVersion as “git hash – $(CommitHash)”.

The whole csproj file will look similar to this:


...

The result is that after building the project, the output file property “Product Version” contains the git hash.

Hope this can be useful to someone 🙂

IPtables-translate, JSON and misfortune

In these past weeks I started with an iptables translation.

We know that nftables is here to replace iptables, so it is natural that many of its users have their preferred rules set with iptables, and would appreciate to have an easy way to set a similar ruleset using nftables, for this iptables-translate is provided.

Using iptables-translate is very simple, you just need to write your iptables rule and it outputs a similar rule in nftables if the rule is supported, if not then the iptables rule will be printed. An usage example:

$ iptables-translate -A OUTPUT -m tcp -p tcp –dport 443 -m hashlimit –hashlimit-above 20kb/s –hashlimit-burst 1mb –hashlimit-mode dstip –hashlimit-name https –hashlimit-dstmask 24 -m state –state NEW -j DROP

Translates to:

nft add rule ip filter OUTPUT tcp dport 443 flow table https { ip daddr and 255.255.255.0 timeout 60s limit rate over 20 kbytes/second  burst 1 mbytes} ct state new counter drop

The above example comes from the module I wrote the translation to, hashlimit, it’s similar to flow tables in nftables. Each module is translated separately and the code is in its iptables source file, much of the supported features have their translation written but some still need some work. Writing them is an actual nftables task in this round, future interns, go and check the xlate functions in the iptables files, it can be of great help to the community and to yourself 🙂

After this task I looked into the JSON exportation of nftables ruleset, in the future importing a ruleset via JSON should also be possible, but for now only exporting is. This feature is still being defined and many changes are happening. What I did was to complement a patch to define some standard functions and use them to export rules. JSON in nftables is a little messy, probably it will get more attention soon.

Now about misfortune, last week an accident happened and my notebook is no longer working, I’m trying to have it fixed but it stalled my contribution with patches. Hopefully next week this will be sorted and I can finish some patches.

I’ll probably write a new post about my experience with Outreachy soon, now it is late and I need to go home :), see you.

Documentation weeks

nftables has two main documentation sources:

  • nftables wiki, the wiki provides an example oriented documentation, so the user can see how the features are useful in practice. Usually the wiki also states which Kernel and nft versions are needed for each feature. Also, since many nftables users come from iptables, it is useful to compare a feature to the one it replaces in iptables.
  • nft manpages, the manpages are directed to users who have some experience with the software, usually the grammar of a feature is displayed and the existent values for each component listed, along with a short description.

These past two weeks were all about documenting parts I helped implementing and others which I didn’t. Providing a good documentation is tricky, you should put yourself in the user shoes and write what’s relevant to them.

I have a feeling that documenting a feature you didn’t work leads to better results, since you don’t need to make an effort to visualize the system as an unexperienced user does. However, it is a lot harder, when you are writing references for a feature it usually means you can’t find other references except on git log and the code itself.

It feels similar to hunting bugs, actually odds are you find some in the process, or at least some unexpected behavior. I found a few places I thought worthy of improvements but this thought didn’t ripen, the reason being it provides less benefits than loss to fix them. In these past two weeks I’ve seen this a few times, after some thinking and tracking the code changes I’d see they are planned behaviors, using git blame and git log you can track the reason for the changes and often they’re a trade, an undesired behavior is allowed (when it doesn’t brake things) to avoid code duplication or too much complexity. Guess I should change my mindset to optimizing for simplicity and code maintenance.

Even though most of the “bugs” weren’t real bugs, I think I found one that really is and will try to fix it for now, see you.

Bugs solving week

There is only one week since my last post, so this is a short one.

Last week was focused on searching bugs and solving the ones I’m able to, some of them were suggested by my mentor and others I tried to choose by myself, wasn’t very lucky with those.

A good(?) thing about bugs is that they happen in every part of the system and you must chase them wherever they are, including places you’re not comfortable in.

For example, one of the bugs was a dependency issue, usually the building process follows this flow (when autoconf is used):

sh autogen.sh    (1)
./configure          (2)
make                   (3)
make install       (4)

There is usually a file named configure.ac, which contains system specifications and dependencies; this file is used in (1) to generate a configure script, which by its turn will be used in (2) to create the Makefile, needed in (3) to compile your files together. Finally (4) puts the resulting file in a appropriate place and the program is ready to be executed.

It’s expected that if ./configure finishes without errors then make and make install also will, however, that wasn’t always the case in nftables. To solve this bug I just needed to change the dependencies in configure.ac, the fix patch is a boring oneliner, the fun is in reproducing the bug and testing it.

To check the version of a dependency, configure.ac uses PKG_CHECK_MODULES(), this macro searches the dependency in some specific folders (read man pkg-config). It’s up to the developers to provide a .pc file when the software is installed, so pkg-config can find it; sometimes they don’t and you have two options, search for a source which does or write this file yourself, see what xtables.pc looks like:

prefix=/usr/local
exec_prefix=${prefix}
libdir=${exec_prefix}/lib
xtlibdir=${exec_prefix}/lib/xtables
includedir=${prefix}/include

Name:           xtables
Description:    Shared Xtables code for extensions and iproute2
Version:        1.6.1
Cflags:         -I${includedir}
Libs:           -L${libdir} -lxtables
Libs.private:   -ldl

Also, sometimes you upgrade or downgrade a library and the .pc file isn’t updated, what misleads your configure script and may cause unwanted behavior, be careful about it.

Other bugs were less interesting, two of them were only a table presentation fix and the last one I couldn’t reproduce, even after a lot of code digging and configuration changes, apparently it vanished somehow within the updates – and not much information was given, what makes reproducing it harder.

I’m still working on one, actually it’s a request for a new small feature for the parser, will enter in details later when I have some conclusion about it. See you.

Stateful objects, ICMP, bugs and tests

Sorry for the delay to post, this was a full week. Moving out is a laborious task, fortunately it is over now and I found time and inspiration to blog.

The past weeks were focused on a few good tasks, I’ll talk about them separately. One point they share is the need to track the execution path in code, many git greps and printfs were used but I think now I got a much better view of how everything works. When I need to see what a specific part of the execution does, I nearly always know instinctively what file/routine to analyze; this applies to nftables and libnftnl, in the kernel code I can’t always find my way easily, that’s a work in progress.

Now, about the actual tasks, one of them dealt with ICMP headers.

You can build rules in nftables to filter ICMP packets based on its header fields. Wikipedia has a good article about this protocol and shows that some header fields are variable. The meaning of the last 4 btyes depends on the fields type and code, the same field can represent mtu and sequence for example. But, this is a normal behavior, why this is relevant? Because nftables currently matches the offset of the field, to know which field to display on list ruleset. You can see this adding the rule:

$ nft add rule filter input icmp mtu 33 accept
$ nft list ruleset

<…>
icmp sequence 33 accept
<…>

Like I said, it matches the offset to know the field, since the fields mtu and sequence have the same offset they are displayed the same – in this case as sequence. I don’t think it spoils the filtering, the system will filter mtu, even though it displays sequence, although I’m not 100% sure on how the kernel handle this kind of rule. I say this because when a rule is written it has the right field on it, and the right message is sent to the kernel, which will set up the filtering. The problem happens on list ruleset, nft asks the active rules and the kernel return some structures. With these structures nft builds and displays the ruleset; when the rule is about ICMP header fields it has only the offset field available, and based on the offset the field name is chosen.

I spent more time that I’d like to admit to find the exact routine, where the field name is chosen, and to understand how the header matching works. Went trough the whole process of matching a rule, evaluating it, linearizing it to send netlkink messages to the kernel, and finally doing something similar to list the rule.  My conclusion is: with the available information, received from the kernel, it’s not possible to always display the right field. I think we need to add a new field to the message describing the rule the kernel returns.

I added a new field to header structures, on the corresponding parts of the nft, libnftnl and kernel code; After a little debugging, the ICMP fields were displayed as expected with list ruleset. However, the changes were a little intrusive and I can’t evaluate the side effects they have, also, maybe there is a simpler way that I didn’t see. The patches are still being evaluated.

That’s it for ICMP, in summary, the fix I proposed wasn’t applied yet, maybe never will, but making it taught me a lot about how the system works. It was good for learning, hopefully the report was useful to at least provide a new insight about the problem.

The next task was about stateful objects, this one yielded patches after some time invested. Stateful objects are a new feature of nftables, you can read about them here. In a few words, they make counters and quotas, also limits in the future, independent from rules, to help organizing the ruleset. Most of it was implemented in the linked patchset, but some features lacked the code, in nft, to work.

The main feature needed was to reset a single object in a table, a provisional patch was available to base the changes on. This provisional patch proved to be almost ready to join the codebase, only needed improvement on evaluating the command before executing and some testing. Then I worked on listing a single object, and reseting and listing all objects in a table, all related to the first one. After those new features I went to create some tests for stateful objects, the testing system in nft is divided in python and shell tests.

Shell tests are used to test for high level functionalities and bugs, sometimes when a bug is disclosed a shell test is created to make sure this bug never appears again. I wrote a shell test for a known bug last week, and while thinking and experimenting I found another one. Usually the bugs of nftables are archived here, until they’re cleared. The new found bug was solved by Pablo, in a lot less time than it took me to experiment and write the bug report, and also inspired a shell test.

Python tests are more focused on functionalities and system behavior, at a lower level than shell tests, it simulates the end user. Many of the possible rules are tested, an example is create a set and reference it in a rule. What I said about ICMP and the header fields is tested in this suit, and results in many warnings because a mtu rule is listed as sequence.

Before sending a patch to the mailing list you must run both test suits. If it triggers a new error, then you better not send it; I did, on my first patch, tested a lot before sending but wasn’t aware of the automated tests and broke some of them with the patch. A few hours later I received a friendly warning to never do it again, never did. In fact, the past week I helped on making new tests, the shell tests mentioned and a some pytests for stateful objects.

As I said, stateful objects are a new feature, there were no tests for it, actually, the python tests had no support for adding stateful objects to them. Then, the first step was to provide this support, modifying the script that read the testcases so it allows adding objects to tables and referencing them in rules. Next step was to create the actual tests, they test for adding objects to tables and creating simple rules with them. Having tests to detect bugs is very helpful, sometimes even when the bug has no solution yet it’s useful to create a test for it, to remind that the problem exists and must be addressed.

Although this past week was full of unrelated but urgent issues, I liked those past three weeks very much – this one isn’t over yet, the weekend will be full of bug solving :), I did work on many different parts of the system and get used with them.

Once I said about having a post dedicated to how nftables is organized under the sheets, a kind of guide aimed to those starting on it as developers. I feel more comfortable to start it now, probably this week I’ll begin it and update it when its needed. See you.

Sets and linked lists

Last post when creating rules we used:

nft add rule ip foo bar tcp dport http counter
nft add rule ip foo bar tcp dport https counter

Two rules used for the same command, could be convenient to add http and https into a single structure, right? For this we have sets, instead of the previous two rules we can type:

nft add rule ip foo bar tcp dport { http, https } counter

Where { http, https } is a set. It’s possible to create a named set, where you can add and delete elements as you will:

nft add set ip foo serv_set { type inet_service \; }

The new set is named serv_set and holds elements of type inet_service. To add elements to it:

nft add element ip foo serv_set { http, https }

And to delete http from serv_set:

nft add delete ip foo serv_set { http }

Rules can reference named sets by “@set_name”:

nft add rule ip foo bar tcp dport @serv_set counter

Now we know what are and how to use sets, the elements it holds can be of different types, not necessarily inet_service. The elements a set holds are available in a linked list, nft uses the same implementation of kernel’s linked lists, even though it runs in userspace. The kernel has an official linked list implementation since version 2.1, it was necessary to avoid code duplication and guarantee efficiency.

This list is circular and doubly linked, has a pointer to next and previous elements. An element is represented by the struct list_head:

struct list_head {
struct list_head *next;
struct list_head *prev;
};

To create a linked list of your own structs you just need to embed struct list_head in it. Taking struct book as example:

struct book {
int        npages;
int        pdate;
char       *name;
char       *author;
};

To make a list of struct book it becomes:

struct book {
struct list_head    blist;
int                 npages;
int                 pdate;
char                *name;
char                *author;
};

To iterate on the elements, or to modify the list you just need to write routines, or use the ones available, that manipulate struct list_head. Accessing the element that contains the struct list_head is simple with the macro:

container_of(pointer to list_head, typeof of the struct it is embedded in, name of the list attribute in the struct)

In our example:

container_of(&variable, typeof(struct book), blist)

This implementation is well documented and is available here.

Now, returning to nft sets. Every time the set is created, the elements are stored in a different order, that’s because the kernel uses a hash table with a random seed.  When “nft list ruleset” is called, set elements are returned in a linked list in the order defined during the set creation. Then, when a set is created twice, the calls of “nft list ruleset” might return the elements in a different order.

When tracking your ruleset via git, some changes can be unnecessarily triggered, in case the set has the same elements as before but now listed in a different order. To solve this issue it’s necessary to sort the elements.

There is no standard routine to sort linked lists in C, so I had to implement it. A trivial sort with O(n²) complexity took minutes to list big sets, so, a faster algorithm was needed. I chose Merge sort, it has O(n*log(n)) complexity in all cases.

The algorithm is basically:
• Split the list in two
• Sort the two halves separately
• Merge the two halves sorted

The best part was to implement the comparator of elements, this part is specific to what is being sorted. In nft I had to sort elements of a custom type, won’t enter in much detail now because I want to write about how the structures in nft’s codebase in a future post.

That’s it, here is the patch. See you.